Wednesday, November 30, 2011

Battery Connections

The 4, 19.2 Volt Craftsman batteries are arraigned into a  2 batteries in Series and 2 batteries in Parallel arraignment. This will give me a total battery pack Voltage of 38.4 Volts and sustained current of up to 20 Amps.


There are 4 Shockley Diodes, one across each battery output, to protect each battery's BMS.


The battery connections are made using heavy 16 Ga. speaker wire. I used a grinding bit to remove enough plastic from the stem of the battery socket to get the wire to fit flush with the top of the plastic.
Then soldered the battery connector wires and the Diodes in place.


Monday, November 28, 2011

Battery Sockets (continued)

To get the battery sockets to fit together better I used a small round carbide bit to gouge a couple of holes in the plastic sockets.  This will allow the solder terminals to fit into the gouged holes to get the battery packs to fit into the battery compartment of the bag.

A "Kick Back" Diode needs to be placed across each batteries terminals on the battery socket to prevent the burning out of the BMS incorporated into each of the Lithium batteries.
In the event that any of the individual battery management systems is to shut down a battery while under a load there will be a very brief back voltage and current trying to back flow into the remaining batteries that are still connected in the 3 remaining battery arraignment.  A 50 volt, 10 Amp, Schottky Diode across each battery will prevent the back flow of current into any remaining battery BMS still under load at the time of battery circuit interruption.

I used a small carbide grinding tool to make a pocket for the diode to set inside of the solder terminal area of each battery socket.
 The Red paint demotes the Positive terminal of the solder terminal, the banded end of the diode will connect to this Red terminal.  This will only allow current flow in the reverse direction, like when "kick back" would occur.

Saturday, November 26, 2011

Battery Sockets made from Nonworking 19.2 Volt Work Lights

I purchased 6 nonworking 19.2 Volt work lights on ebay.  I will cut the unneeded portions off leaving just the battery socket. It is going to be a snug fit to get all 4 batteries into the center compartment of the bag.


Attach Battery & Control Bag

The 600D Oxford cloth carrying bag has a zippered main compartment for battery and 2 side compartments for Motor Controller, on one side, and on the other side, a compartment for the Lead Acid Battery Charger.
I am going to use 36 volts of Lithium batteries so that way, I will use the battery charger side for spare parts or a tool kit. I will remove the Lithium batteries from the bag to recharge them.


The bag attaches with Velcro strips that wrap around the metal shelf's frame.

Adjust Thumb Throttle Position

I have concerns that the right hand gear selector will interfere with the Battery Power Level Indicator & Thumb Throttle. I removed the handle bar grip and cut off 1 inch of the grip to get more room for the gear selector.  This gear selector may need to be moved in the future if it is uncomfortable to select the rear gears.

Making Battery Sockets from 19.2 Volt Work Lights

I will cut the Craftsman 19.2 Volt work lights off at the work light battery slide connector.  I tried to match the contour of the work light base that mates to each other.  Notice that the solder wire terminals are protruding above the cut.  I need to get these socket and battery assemblies as short as possible to get them in the battery compartment.  The total battery length needs to be under 16 inches.


In the last photo the protruding solder tabs are plainly visible and I will need to grind some relief holes in the mating battery holder.

Attach Rear Shelf

I attached the rear shelf with #10, 32 TPI Socket Head Cap Screws and 1/8" Fender Washers as needed.
I put a slight bend in the metal shelf support rods, behind the seat, to get the shelf to be level over the rear wheel.


Thursday, November 24, 2011

Fitment of Hub Motor Axle Flats into Bike Frame Dropouts.

Thanksgiving Day, I had a little time while the meal was cooking.
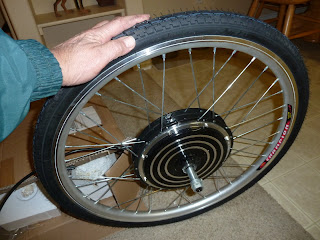
I swapped out the low rolling resistance (LRR) street tire that came with the hub motor kit to my mountain tire.  I also added a thorn proof tube and thorn guard liner.
I removed the rear wheel and test fit the Hub motor axle flats into the bike frame drop outs.  I had to do a little grinding with a small flat file to get the motor axle to seat completely into the bike frame dropouts.  I only needed to widen the dropout about .030".  I also used a round file to radius the back of the dropout to match the radius of the motor axle, so that it would seat perfectly in the dropout and the wheel is centered in the bike's rear frame.


I also filed the tabbed washers so that the tab fits into the safety hole behind the dropout.


The next step is to remove the brake levers and replace them with the new brake levers included in the hub motor conversion kit.  The new brake levers have a electrical switch incorporated within the lever that interrupts the power to the motor when either of the brakes are applied.

Tuesday, November 22, 2011

Why Build and Electric Bike?

One of the things that I have had on my "Fun To Do List" is to build and electric bike.  The electric S10 Electric Conversion has been working very well! I have had great luck with the S10 being my daily driver to and from work.  I want to expand my DIY EV experience by building an electric bicycle.  I think this will be a fun and exciting project.  Building an electric bike will share many of the same design challenges as building the electric S10 and I should be able learn the characteristics of Lithium tool batteries in adding electric power to the normally human powered bicycle.

Monday, November 21, 2011

36 Volt, 800 Watt, 6 Gear, 26 In. Rear Wheel Kit Arrives.

This afternoon the 36 volt, 800 Watt, 6 gear, 26 In. rear wheel bicycle conversion kit arrives from Ebay seller YescomUSA.


The large package arrived none the less for wear.  I opened the package up and all parts are neatly secured with Styrofoam, boxes and plastic wrap.

Thursday, November 10, 2011

DIY Bike for Conversion, Vintage 1980s "Specialized" 26 Inch, 18 Speed Mountain Bike

I selected a Vintage 1980s Specialized Hardrock 18 Speed, 26" Mountain bike for this my first electric bike conversion.

I chose this bike because it is in good shape for it's age and it is a very durable bike.  I know it does not have all of the bells and whistles of many bikes today, but I like that it is made in the USA and is a solid base for my first conversion.